Getting started with the Region, Currency and Language selector •
The region, currency, and language selector in the app is fully customizable.
On this page
- How to Activate the Selector
- Selector Type Configuration
- Selector Label and format
- Selector Position Configuration
- Selector Style
- Selector Search Feature
- Selector Redirection Configuration
How to Activate the Selector
-
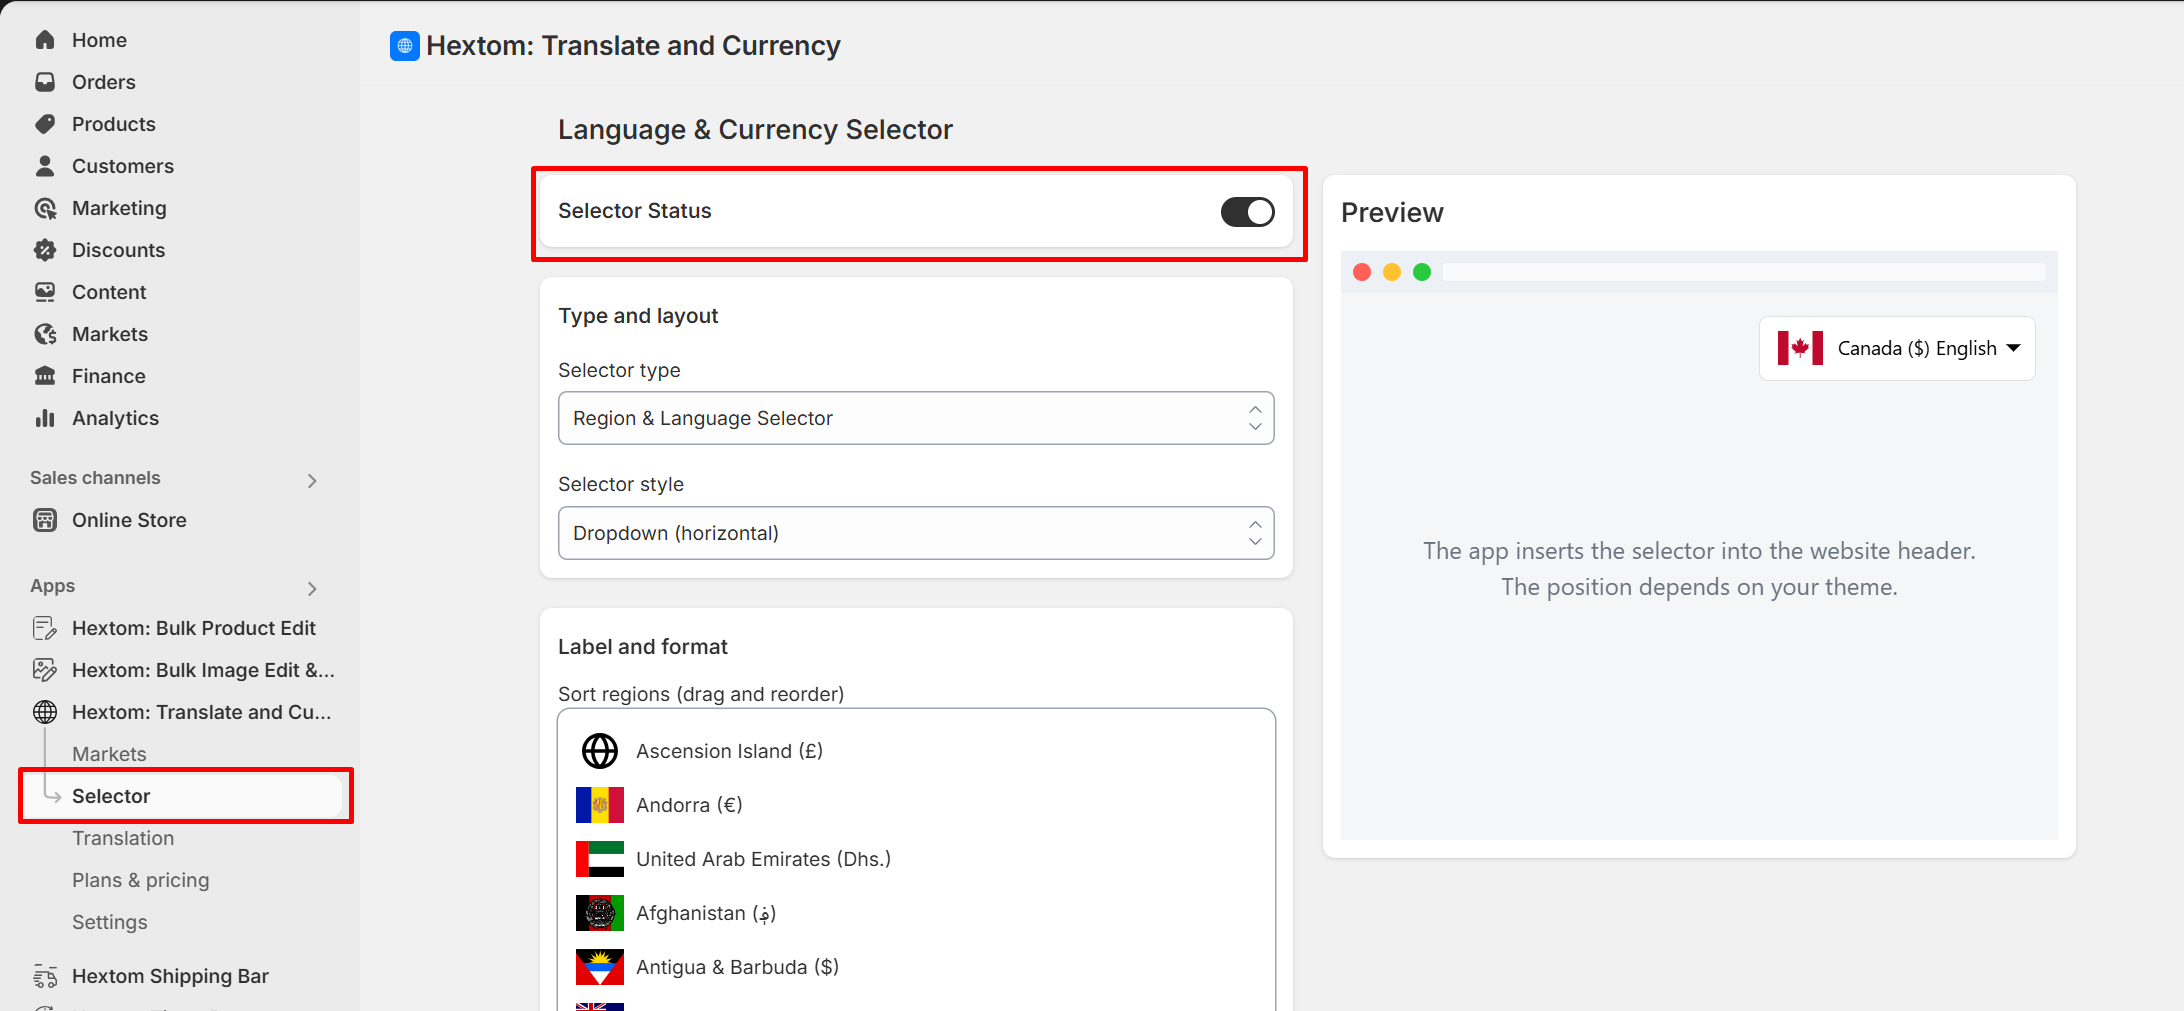
Go to the Selector page and enable the selector.
-
Choose a selector type from the list of options and then click Save near the bottom of the page.

- Our app's selector should now be visible on your website.


Note:
If the selector doesn't appear after enabling it, please refer to this guide and enable the app extension.
To further customize the selector, please continue reading below.
Selector Type Configuration
Our app offers a variety of Selector types that you can choose from namely:
- Region & Language Selector
- Region Selector
- Language Selector
- Currency & Language Selector
- Currency Selector
You can select the option that best fits your configuration. In the example below, I’m using a "Region & Language Selector" because I have multiple languages and regions/currencies set up in my Shopify markets settings.

You can customize the selector's style by choosing from a dropdown with a vertical layout, a dropdown with a horizontal layout, or an overlay.
Preview of Dropdown selector (Horizontal layout)

Preview of Dropdown selector (Vertical layout)

Preview of Overlay layout Selector

Selector Label and Format
There are also several visual customization options, including:
- Re-ordering the displayed regions, currencies, and languages
- Displaying regions by name or code
- Displaying currencies by name, code, or symbol
- Displaying languages by name or code
- Including or excluding flags


Selector Position Configuration
You can choose from four different selector positions:
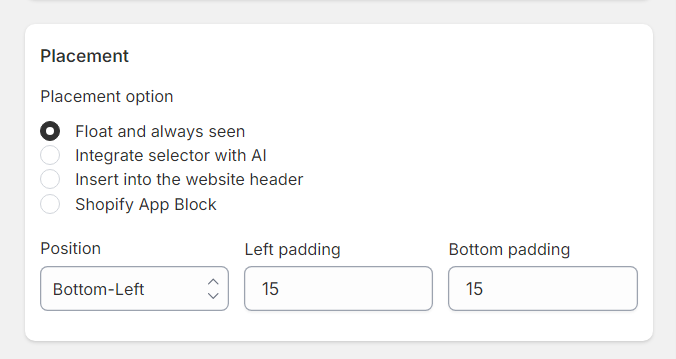
- Float and Always Seen – When the floating option is selected, the selector will appear as a floating element on your store and remain visible while customers browse.
- Integrate Selector with AI – With this option, the AI analyzes your live theme and automatically places the selector in suitable locations for both desktop and mobile. Once you're done configuring your settings, remember to save. If the placement isn’t ideal, please contact us at help@hextom.com for assistance.
- Insert into the Website Header – This option automatically inserts the selector into your website’s header section, making it visible at the top of your store. This is useful if you want the selector to be part of your main navigation area.
- Shopify App Block – This option allows you to place the selector anywhere in your store using Shopify’s app block system.
Do note that there are additional configurations when you click each option.
Float and always seen – Choosing this option allows you to configure the position, left padding and bottom padding. Increasing the padding moves it farther from the edge of the screen, while decreasing it brings it closer.
Integrate selector with AI – You can choose the preferred positions for each device (for example, Header on desktop and Drawer menu on mobile). Additionally, you can also choose a different configuration for each device if you wish.
Insert into the website header – Once you choose this option, you will be asked to select the theme that you are using. If the theme isn't in the list, please contact us at help@hextom.com for assistance.
Shopify App Block – You can follow this guide here to add the selector to your desired section within the theme editor.
Selector Style
In the Style settings, you can customize the font color, background color, and background opacity of the selector to match your store’s design. Additionally, the Custom CSS field allows you to adjust the selector’s position and appearance with CSS. Two example buttons are provided to quickly insert sample CSS, which you can further customize as needed.

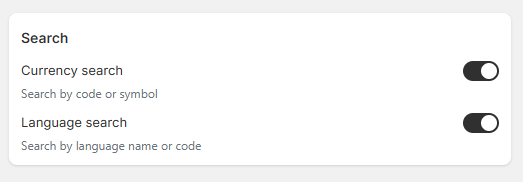
Selector Search Feature
You can enable the search feature to make it easier for your customers to find the desired currency or language without scrolling through the full list of supported language/currency:
- Currency Search - Search by code or symbol
- Language Search - Search by language name or code
Selector Redirection Configuration
The selector can also control the default region, currency, and language that customers see when they first visit your store. You can choose to display a specific language or currency when they visit.
Here is the breakdown of the auto redirection section,

In order to access the auto redirection configuration, please toggle this switch to enable it.

Here, you have the option to select the default region or language,

For our paid plans, there is an option available to automatically detect the customer's browser language and region in order to assign the appropriate language and currency.
Currency Redirection
In order to automatically redirect the currency based on the customer's geographical location, please select the option ( Customer's geo location based ) from the drop-down menu.

Language Redirection
In order to automatically redirect the language based on the customer's browser language, please select the option ( Customer's browser language ) from the drop-down menu.

In order to automatically redirect the language based on the customer's geographical location, please select the option ( Customer's geo location based ) from the drop-down menu.

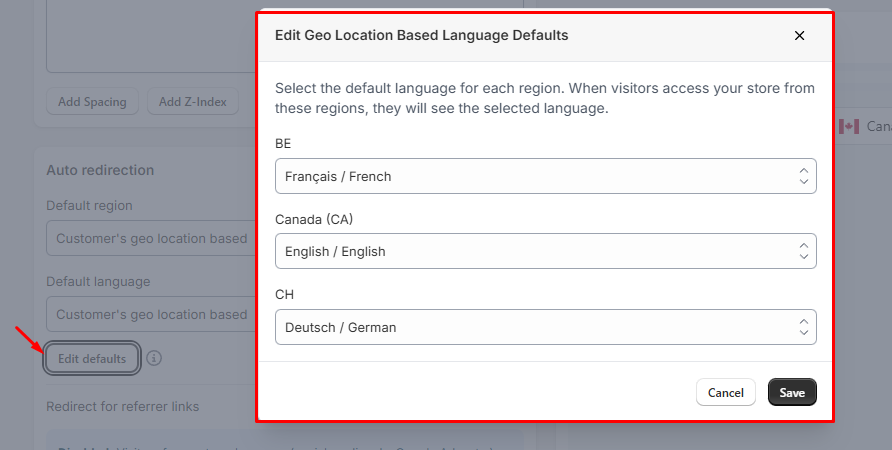
For regions with multiple official languages (e.g., Canada: English & French), you can set your preferred language so that visitors are redirected exactly where you want by clicking Edit defaults.
Redirect for referrer links, give you greater control over how customers experience your store and help improve the accuracy of your marketing links.
When Disabled,

When Activated,

The selector can also enable a Right-To-Left (RTL) layout. When a language that uses RTL is selected, the theme will adjust to display the store accordingly. However, it's the theme's responsibility to properly display all store elements in RTL mode, so please ensure your theme is RTL compatible before enabling this option.

If you have any questions or concerns about the Selector, or anything else, please send us a message at help@hextom.com